
Use a short, pre-declared confluence checklist and require at least three independent confirmations plus a defined stop before entering a trade. That's the whole rule. A confluence checklist is a fixed set of criteria you score before entry, not after.
- Rule: 3+ independent signals, a higher-timeframe gate, and a stop written down before you click buy or sell.
- If you can't check all three, skip the trade or copy the template below and wait for a cleaner setup.
Key Takeaways
A confluence checklist works because it forces three independent confirmations, a higher-timeframe gate, and a pre-declared stop before any trade decision.
| Point | Details |
|---|---|
| Require independence | Count only unrelated signal categories; stacking correlated indicators inflates confidence without adding real evidence. |
| Set a hard threshold | Treat 3 confirmations as tradeable, 4 as preferred, and 5+ as a rare A+ setup worth normal, not oversized, sizing. |
| Gate with higher timeframe | Skip trades that fight the daily or 4-hour trend, even when lower-timeframe signals look aligned. |
| Log the count every time | Record confluence score, grade, stop, and result at entry so monthly reviews can validate your threshold with real data. |
| Pair technicals with behavior | Tools that score decision quality alongside chart signals catch process errors a checklist alone can miss. |
Table of Contents
- What Does Confluence Mean in Trading?
- Why Use a Checklist Before Every Trade?
- Which Signals Count as Independent Confluence?
- How Many Confirmations Should You Require?
- What Does a Confluence Checklist Template Look Like?
- How Do You Build the Checklist Into Your Trading Routine?
- How Does Behavioral Scoring Strengthen a Confluence Checklist?
- What Are the Most Common False Confluence Signals?
- Should Confluence Rules Change With Market Conditions?
- How Should the Checklist Guide Trade Management and Exits?
- What Tools Help Traders Spot Confluence Faster?
- Do Confluence Checklists Actually Improve Results Over Time?
- A Personal Note on Sticking to the Checklist
- Frequently Asked Questions
- Sources
What Does Confluence Mean in Trading?
Confluence is the alignment of multiple independent technical methods at the same price. Traders have used the term for decades to describe why some levels attract more reaction than others: several unrelated tools point at the same spot.
The catch is independence. A 50-period moving average and a 200-period moving average both measure trend, so stacking them isn't two confirmations, it's one idea counted twice. Independent confluence means combining categories that measure different things: a structural level, a momentum reading, a Fibonacci zone, a candlestick trigger. Three correlated indicators agreeing tells you less than two unrelated ones agreeing, because correlated tools were always going to agree with each other. That distinction is the difference between a checklist that filters bad trades and one that just feels reassuring.
Why Use a Checklist Before Every Trade?
A checklist filled out before entry stops you from rationalizing a bad trade after the fact. Without one, it's easy to glance at a losing chart and "discover" three reasons it should have worked, reasons you never actually saw in real time.
Writing the count down before you click also gives you data. Over 50 or 100 trades, you can test whether your 3+ threshold actually outperforms 2 or 4, something no amount of gut feel will tell you.
- Locks in your reasoning before outcome bias can rewrite it.
- Creates a testable dataset of signal count versus result.
- Forces a trade-off: more confirmations mean fewer trades but higher precision, a real cost worth measuring, not assuming.
Which Signals Count as Independent Confluence?
Build your checklist from categories that measure genuinely different things, not five flavors of the same trend indicator. Practitioner guides consistently group independent signal categories into these buckets:
- Higher-timeframe trend — check the daily or 4-hour chart direction before anything else; this is your gate, not just another point.
- Horizontal support/resistance — a prior swing high, swing low, or session open that price has reacted to before.
- Fibonacci premium/discount zones — the 61.8% to 79% retracement (often called the OTE, or optimal trade entry) on the move you're trading against.
- Moving averages as dynamic support/resistance — use one, not three, or you'll double-count trend as a separate signal.
- Volume or momentum divergence — a stalling indicator like RSI or a volume spike that contradicts the last leg of the move.
- Candlestick trigger — the actual close that tells you to execute, like an engulfing bar or a rejection wick at your anchor.
- Session and liquidity context — is this the open of a major session, or a dead stretch where fills are unreliable?
Several of these categories overlap with the standard toolkit covered in primers on common market indicators, which is worth a read if you're still assembling your own list.
Pro Tip: Pick one trend tool and one momentum tool, then stop adding indicators. Five indicators that all measure trend give you a checklist that only looks rigorous.
Grading tools built around this logic, including the Chart Whisperer confluence checker, treat the higher-timeframe trend as a non-negotiable gate: without it, even a stack of aligned lower-timeframe signals is a lower-probability fade.
How Many Confirmations Should You Require?
Score one point per independent category, never more than one point per category regardless of how strongly it fires. A common threshold structure looks like this:
- 0 to 2 confirmations: stand down, no trade.
- 3 confirmations: tradeable, standard size.
- 4 confirmations: preferred setup, can justify slightly larger size.
- 5 or more confirmations: an A+ setup, rare enough that it should still get normal or slightly reduced size, not oversized conviction bets.
The 3+ threshold is the most commonly cited floor for a tradeable edge, and grading frameworks like Chart Whisperer's checker use nearly identical bands. Confluence raises the odds in your favor, but it doesn't remove risk from the trade, which is why pairing the score with a structural stop and grade-based sizing matters more than chasing a perfect score. A 5-factor setup that shows up once a month isn't a reason to abandon your normal risk per trade on the rare occasions it appears.
What Does a Confluence Checklist Template Look Like?
Copy this six-line template into your journal or chart notes before you enter anything:
- Context: higher-timeframe trend and bias (up, down, range).
- Anchor: the structural level or zone you're trading from.
- Confirmations: list each independent signal that fired, by category.
- Trigger: the exact candle close or event that executes the entry.
- Stop/invalidation: the price that proves the idea wrong, set before entry.
- Exit/size: target, partial-exit plan, and position size tied to your grade.
Here's a worked example on a pullback into a discount zone:
Context: daily uptrend, 4-hour pulling back. Anchor: prior swing low at 1.2050. Confirmations: HTF trend up, price in 61.8%–79% Fibonacci zone, bullish engulfing candle, RSI showing bullish divergence. Trigger: engulfing candle closes above 1.2065. Stop: 1.2038, below the swing low. Exit/size: partial at 1:1, remainder trailing, full size (four confirmations, preferred grade).
That's four independent categories, a preferred-grade setup under the scoring bands above.
Pro Tip: Time yourself filling this out. If it takes more than a minute once you know your categories, you're overthinking the entry, not analyzing it.
How Do You Build the Checklist Into Your Trading Routine?
The checklist only works if it happens at the same points in your day every time, not just when a setup looks exciting.
- Pre-market: mark your higher-timeframe anchors and set price alerts at each one, so you're not scrambling to draw levels mid-move.
- At entry: fill in all six template fields, including the confluence count and grade, before you click.
- In your journal: track confluence count, grade, stop distance, and result on every trade, following the same discipline that process-oriented traders apply to their entire workflow. A dedicated journal, whether that's a spreadsheet or a platform like the ones compared here, makes this far less painful than sticky notes.
- Monthly: review whether your 3+ threshold is actually outperforming looser entries, and adjust sizing bands if the data says otherwise.
How Does Behavioral Scoring Strengthen a Confluence Checklist?
A technical checklist tells you whether the chart lines up. It doesn't tell you whether you're the kind of trader who skips step four when you're impatient, and that gap is where most blown setups actually come from.
This is where decision-intelligence tools add something a static checklist can't. Eialgos scores each setup across six behavioral factors alongside your technical confirmations, flagging patterns like consistently oversizing on 3-confirmation setups or entering before the trigger candle closes.
- Automated logging turns every filled-out checklist into a dataset you can actually review, instead of a stack of forgotten notes.
- A personalized assistant like Eialgos's LIANA can surface repeated process errors, such as ignoring your own HTF gate, that are hard to spot trade by trade.
- Behavioral scoring doesn't replace your technical confluence count. It explains why you sometimes ignore it.
What Are the Most Common False Confluence Signals?
The single most common mistake is counting correlated indicators as separate confirmations. Three moving averages, an oscillator derived from price, and a trendline drawn on the same swing are all measuring trend. That's one signal wearing four costumes, not four signals.
A second trap is confluence that only exists on the timeframe you're staring at. A setup that looks stacked on the 5-minute chart but contradicts the 4-hour trend isn't confluence, it's a fade dressed up as a breakout. Skipping the higher-timeframe gate is how traders end up "confirmed" into the wrong side of the move.
Fibonacci zones cause their own version of this problem. Draw the retracement from the wrong swing, and you'll find a plausible-looking OTE zone almost anywhere, which means it isn't confirming anything, it's confirming your bias. The same goes for candlestick triggers taken in isolation. A bullish engulfing bar at a random price means far less than the same candle at your pre-marked anchor level.
Round numbers and psychological levels get treated as structural confluence more than they deserve. A price ending in .00 or .50 isn't automatically support, unless prior price action actually reacted there. And confluence found only in hindsight, after scrolling back through a chart looking for reasons a trade should have worked, isn't confluence at all. It's the exact rationalization a pre-declared checklist exists to prevent.
Should Confluence Rules Change With Market Conditions?
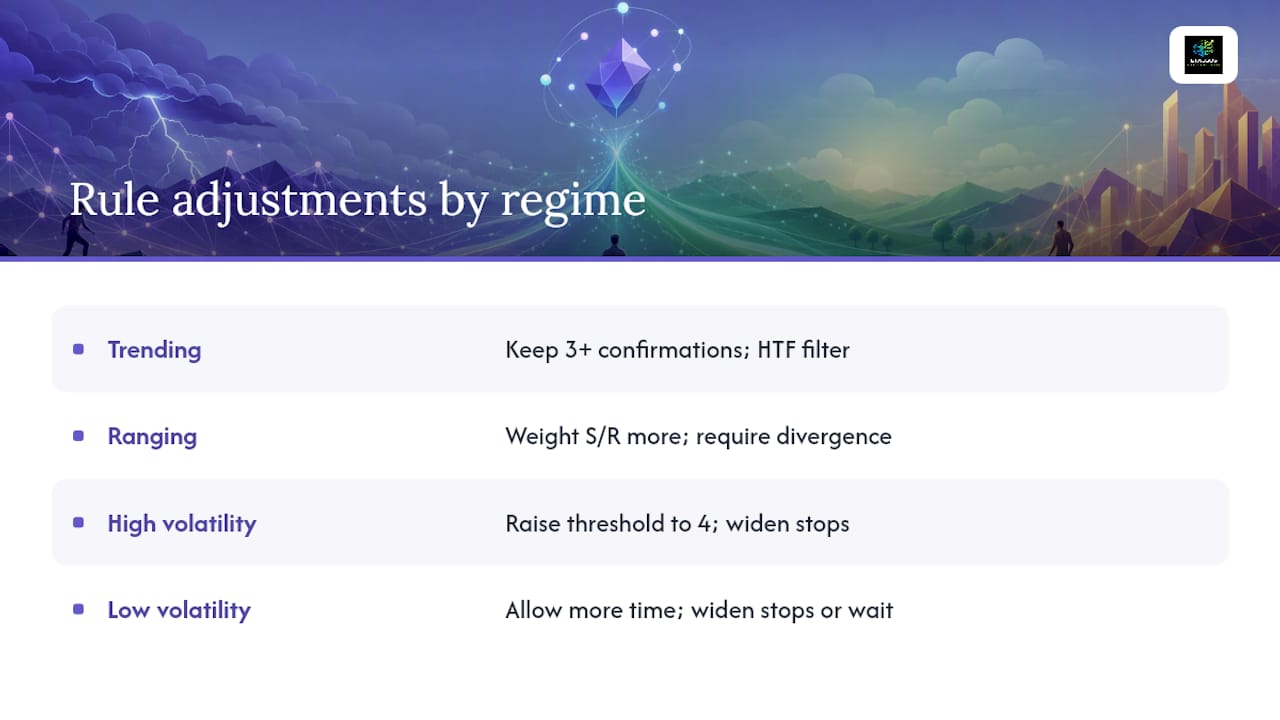
A fixed 3+ threshold works reasonably well in trending conditions, but ranging and high-volatility markets call for adjustments, not abandonment of the rule.
In a clear trend, the higher-timeframe gate does most of the filtering work for you, so three confirmations aligned with that trend tend to be reliable. In a range, that gate is less useful because there's no dominant direction to filter against. Traders often compensate by weighting horizontal support and resistance more heavily and treating momentum divergence as closer to mandatory, since range trades are essentially bets on rejection at the edges.
High-volatility periods, around major news releases or session opens, distort candlestick triggers and can produce false momentum divergence signals as spreads widen and wicks extend. Many traders raise their threshold to four confirmations during these stretches, or simply widen the stop distance tied to the invalidation level so normal volatility doesn't trigger an early exit on an otherwise valid setup. Low-volatility, grinding conditions create the opposite problem: signals take longer to align, and traders who force a 3+ setup into a quiet market often end up with a technically valid checklist and a trade that goes nowhere for hours.
The practical move is to keep the categories fixed but let the bar and the stop distance flex with conditions, and to log which regime a trade happened in so your monthly review can separate a bad threshold from a bad market.
How Should the Checklist Guide Trade Management and Exits?
A confluence checklist doesn't end at entry. The same confirmations that got you in should shape how you manage the position afterward.

If your stop and invalidation level were defined by a specific confirmation, like a structural swing low, that level stays the level. Moving it because the trade "feels" like it needs more room undoes the discipline the checklist was built to create. Partial exits work the same way: a common approach takes a partial profit at a 1:1 or 1:2 ratio to the risk defined in the checklist, then trails the remainder using whichever confirmation was strongest, often the higher-timeframe structure rather than a short-term candle.
Grade should inform management too. A 3-confirmation trade earns a more conservative exit plan than a 5-confirmation A+ setup, since the latter has more evidence behind it holding through minor pullbacks. If a new confirmation appears mid-trade, like a fresh momentum divergence against your position, that's information for your journal, not necessarily a reason to override a stop you set with a clear head before entry.
What Tools Help Traders Spot Confluence Faster?
Charting platforms with custom indicator overlays let you stack your chosen categories, trend, structure, Fibonacci zones, on one screen instead of flipping between tabs. Browser extensions and scripts built specifically as confluence checkers and trade graders go a step further, scoring a setup against your criteria directly on the chart and logging the result for later review.
These tools are discipline aids, not signal generators. They don't tell you to buy or sell; they make your own count visible and force you to see it before you act, which is precisely the value a paper checklist provides, just faster and harder to skip. The best ones persist that score into a trade log automatically, closing the loop between the setup you graded and the outcome you eventually got.
Decision-intelligence platforms extend this further by scoring the behavioral side of the trade alongside the technical one, which matters because a perfectly graded 4-confirmation setup executed in a rushed, emotional state doesn't behave like the same setup taken calmly. No software replaces the judgment of marking your own anchors correctly, but the right tool removes the friction that causes traders to skip steps under pressure.
Do Confluence Checklists Actually Improve Results Over Time?
The honest answer is that a checklist's value shows up in the data you collect, not in any single trade. Traders who record their confluence count at entry and revisit it monthly can actually see whether their 3+ threshold beats looser entries, something that's impossible to judge from memory alone.
The pattern that shows up repeatedly across practitioner logs is that 3 to 4 confirmations tend to balance precision and frequency reasonably well for most retail traders. Push the threshold to 5 or higher and win rate often improves, but trade frequency drops so much that the strategy becomes hard to stick with, and hard to validate statistically because there simply aren't enough trades. Push it down to 1 or 2 and frequency climbs while the edge tends to evaporate, since you're now trading on noise the checklist was supposed to filter out.
This is why the discipline of not changing the checklist mid-test matters as much as the checklist itself. A trader who adjusts their threshold every week based on the last few trades never generates enough consistent data to know if 3, 4, or 5 confirmations actually fits their market and timeframe. The traders who treat the checklist as a fixed experiment, run for dozens of trades, are the ones who end up with a threshold backed by their own results instead of a number borrowed from someone else's market.
A Personal Note on Sticking to the Checklist
The habit that matters most isn't the categories, it's refusing to fill in the checklist after the candle closes in your favor. If you catch yourself adding a confirmation you didn't actually see before entry, that's the trade to flag in your journal, not the one to feel good about.
Frequently Asked Questions
What is a confluence checklist in trading? It's a fixed, pre-declared list of independent technical factors, such as trend, structure, and momentum, that you score before entering a trade to confirm the setup objectively.
How many confirmations should a confluence checklist require? Most frameworks set the floor at three independent confirmations, with four considered preferred and five or more treated as a rare, high-grade setup.
Does confluence guarantee a winning trade? No. Confluence improves the probability a setup works but never removes risk, which is why every checklist needs a defined stop and grade-based position sizing.
Can a confluence checklist work in ranging markets? Yes, but the higher-timeframe gate matters less in a range, so many traders weight horizontal support and resistance and momentum divergence more heavily instead.
What's the biggest mistake traders make with confluence? Counting correlated indicators, like several moving averages, as separate confirmations instead of recognizing they measure the same thing.