
If a short strike gets tested, act on a pre-set delta and time trigger. Don't guess. If the trade is profitable, take the win at a predetermined level instead of hoping for more. That's the entire philosophy behind sound iron condor management: remove the decision from the moment of stress and make it before you ever place the trade.
Here's the checklist to run every time you check a live condor:
- Profit target: close (or roll) at 50% of the maximum credit collected.
- Stop-loss: exit if the position loses roughly 200% of the credit received.
- Time-based close: exit around 21 days to expiration regardless of profit or loss, since gamma risk accelerates fast after that point.
- Do nothing when none of the above triggers have fired and the short strikes still sit outside your delta threshold. Inaction is a valid, rule-based choice, not a failure to act.
Key Takeaways
| Point | Details |
|---|---|
| Set exits before entry | Commit to a 50% profit target and 200% stop-loss before placing the trade, not after. |
| Watch tested-side delta | A short delta of 0.30 to 0.35 is the objective trigger to consider an adjustment. |
| Respect the time window | Close by 21 DTE regardless of profit or loss since gamma risk accelerates fast after that point. |
| Cap your rolls | Limit adjustments to 1 to 2 rolls per trade to avoid the serial-rolling spiral that drives outsized losses. |
| Score decisions, don't guess | Eialgos scores live setups against a six-factor engine so roll, close, or hold decisions follow data instead of impulse. |
Table of Contents
- What Is Iron Condor Management and Why Does It Matter?
- How Do the Greeks Change an Iron Condor Over Time?
- Which Entry Parameters Determine Your Management Plan?
- What Rules Should Govern Every Iron Condor Trade?
- Which Adjustment Should You Make When a Wing Gets Tested?
- What Execution Risks Can Undermine an Otherwise Sound Plan?
- What Mistakes Cause the Biggest Iron Condor Losses?
- How Does Decision Scoring Improve Iron Condor Management?
- Why I Trust Rules Over Instinct on Every Iron Condor
- Turn Your Iron Condor Rules Into a Repeatable Process
- Frequently Asked Questions About Iron Condor Management
- Sources
What Is Iron Condor Management and Why Does It Matter?
An iron condor sells a call spread and a put spread on the same underlying, same expiration. You're short a call and long a further-out call above the market, short a put and long a further-out put below it. The position collects a net credit up front, and that credit is your maximum profit.
You keep the full credit if the stock closes between your short strikes at expiration. You lose money once price pushes past either short strike, and the max loss on either side equals the wing width minus the credit collected. That asymmetry, capped profit against a wider potential loss, is exactly why active management separates consistent sellers from traders who blow up one bad month.
According to backtested and practitioner data, iron condors sold at 15 to 20 delta short strikes see roughly a 65 to 70% win rate at entry if held to expiration. That sounds appealing until you remember the losers tend to be large relative to the winners. Managing the trade actively, rather than letting every position run its full course, can improve the risk profile.
How Do the Greeks Change an Iron Condor Over Time?
Delta on your short strikes is the number to watch first. A short strike near 15 delta implies roughly an 85% chance of expiring out of the money at that moment; as the underlying moves toward that strike, delta climbs and the market is telling you probability has shifted against you. Most professional guidance treats a tested short delta of 0.30 to 0.35 as the point worth reacting to, not before.
Theta is why the strategy exists in the first place. Every day that passes without a big move decays the value of both spreads, and that decay is what fuels the 50% profit target. You're not trying to squeeze out every last dollar of credit. You're harvesting the fastest, cheapest portion of the decay curve and getting out before gamma turns against you.
Gamma is the reason adjustments lose their punch as expiration approaches. Inside roughly 7 to 10 days to expiration, price moves start producing outsized delta swings, and a roll that would have worked cleanly at 21 DTE can fail to accomplish much at 5 DTE. Vega matters too: rolling into a period of elevated implied volatility can mean paying up for the same structural protection you'd get cheaper once IV compresses.
- Delta tells you probability of touch on your short strikes.
- Theta tells you how much time decay you've already captured.
- Gamma tells you how fast that probability can shift late in the cycle.
- Vega tells you whether your adjustment is getting expensive relative to IV.
Pro Tip: Set a standing alert at short-delta 0.30 on both sides. That single number does more to keep you out of trouble than watching the underlying's price all day.
Which Entry Parameters Determine Your Management Plan?
The management rules you'll apply later are baked in at entry. Short-strike delta, wing width, days to expiration, and position size all determine how often you'll need to adjust and how much room you have to do it.
Most swing-style condors use short strikes in the 15 to 30 delta range, with 30 to 45 DTE as the standard entry window. Same-day (0DTE) condors compress that to 8 to 16 delta strikes since there's no multi-week decay runway to protect. Wing width sets your max loss and, as a rough heuristic, credit collected tends to land near one-third of the wing width for a normally priced condor.
| Parameter | Typical Range | Effect on Management |
|---|---|---|
| Short-strike delta | 15 to 30 (swing), 8 to 16 (0DTE) | Lower delta means fewer adjustments, lower credit |
| Wing width | $5 to $10 on index products | Wider wings raise max loss, raise credit collected |
| Days to expiration | 30 to 45 (swing), 0 to 7 (fast cycle) | Shorter DTE means faster decay, less adjustment room |
| Credit-to-width ratio | Roughly 1/3 of wing width | Below 1/3 often signals poor risk/reward |
Position sizing follows directly from wing width. On a $10 wide wing with $3 collected, your max loss per contract is $700 ($1,000 minus $300 credit). At $500 of allowable risk, you're sized for less than one contract at that width, so either narrow the wings or accept a smaller credit target.
- Decide your max acceptable loss as a percent of account equity (commonly 1 to 3%).
- Calculate max loss per contract: (wing width minus credit) times 100.
- Divide allowable dollar risk by max loss per contract to get contract count.
- Round down, never up, when the math lands on a fraction.
What Rules Should Govern Every Iron Condor Trade?
Commit to these four numbers before you place the order, not after the trade starts moving against you.
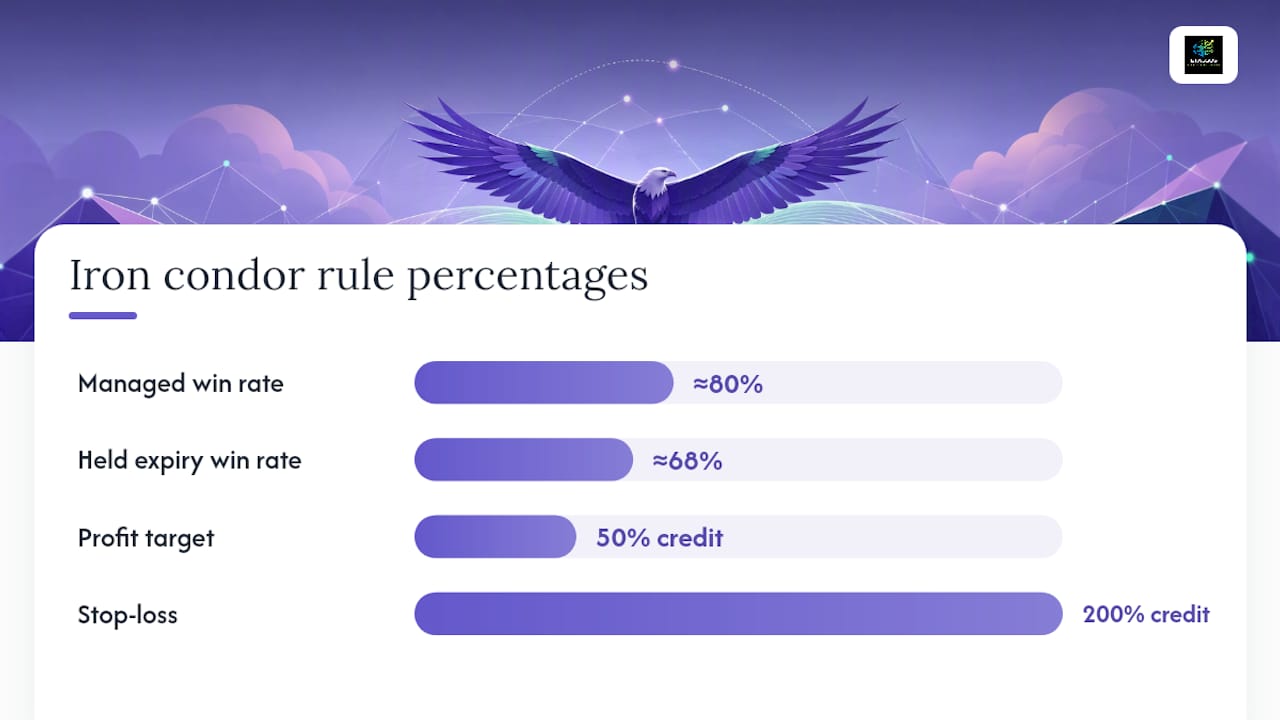
- Profit target: close at 50% of max credit collected. This is the single most cited rule in iron condor management, and managed exits push realized win rates toward 78 to 82% versus 65 to 70% for trades held to expiration.
- Stop-loss: exit once the position's loss reaches roughly 200% of the credit received. A $3 credit position gets closed once it's worth $9, full stop.
- Time-based close: exit by 21 DTE if neither target has hit, since this is when gamma risk starts outrunning the remaining theta benefit.
- Roll limit: cap yourself at 1 to 2 rolls per trade. A third roll on the same position is usually a sign you're fighting the market instead of managing risk.
When two rules point in different directions, the earlier trigger wins. If you're at 21 DTE and sitting on a 35% profit, take the time-based exit; don't wait around hoping the last 15% shows up. If you hit your 50% profit target at 35 DTE, take it immediately rather than holding for the "official" time window.
Before entering any trade, write down your triggers and your single planned adjustment path, then don't improvise once the position is live. That's not busywork. It's the difference between a decision you made calmly at entry and one you're making under pressure with real money already at risk.
Pro Tip: Log your rule set in a trading journal or app before you place the trade. If you have to think about what to do when a wing gets tested, you've already lost the discipline advantage that makes this strategy work.
Which Adjustment Should You Make When a Wing Gets Tested?
Four adjustments cover almost every real-world scenario, and the order in which you consider them matters as much as the mechanics.
Roll the untested spread closer. This is usually the first move professionals reach for because it collects additional credit and reduces net risk on the tested side. The tradeoff: you've now brought the untested side closer to the money, so a market reversal can put both sides at risk simultaneously.
Roll the tested spread away. You buy back the threatened spread and sell a new one further out, usually for a small debit or scratch. This directly reduces the probability of a loss on that side, but it often costs part of your original credit and can reduce your total profit potential meaningfully.
Roll out in time. Push the entire condor, or just the tested side, to a further expiration. This buys theta and often collects a credit, but it extends your risk exposure and ties up capital longer than planned.
Delta hedge with stock or a directional option. Add a small stock or single-option position to offset the delta exposure created by the tested side. This works well for larger accounts but adds complexity and its own set of Greeks to track.
| Adjustment | Best Used When | Main Risk |
|---|---|---|
| Roll untested in | Tested delta near 0.30, plenty of DTE remains | Both sides can become tested on a reversal |
| Roll tested away | IV elevated, want distance from the threat | Costs credit, may cap upside |
| Roll out in time | Near 21 DTE, still believe in the thesis | Extends exposure, ties up margin longer |
| Delta hedge | Large position, want to stay in the trade | Adds tracking complexity |
A workable decision flow runs like this: check whether doing nothing still satisfies your rules. If not, roll the untested spread in first since it's the lowest-cost move. If the tested side keeps deteriorating, roll it away next. Only convert to a butterfly or add a directional hedge if you're trying to salvage a position that's already burned through your normal roll limit, and understand that's a rescue move, not a standard playbook step.
Watch commissions and slippage on every adjustment. A multi-leg roll executed as separate orders can leave you exposed mid-adjustment if the market moves between fills, so use a combined order ticket whenever your broker supports it.
Worked Example: A Tested Call Wing
You sell a 45 DTE iron condor on an index ETF: short call at 20 delta, long call 10 points out, short put at 20 delta, long put 10 points out, collecting $3.00 in credit.
At 25 DTE, the underlying rallies and the short call's delta climbs to 0.33, tripping your adjustment trigger. Here's the sequence:
- Check the profit target and stop-loss first. Neither has fired since the put side is still profitable and offsetting the call side's loss.
- Since DTE (25) is still above the 21-day floor, an adjustment is worth attempting rather than closing outright.
- Roll the untested put spread up to collect an additional $0.80 in credit, bringing total credit to $3.80 and lowering effective max loss on the call side.
- If the call side keeps deteriorating past 0.40 delta, roll the tested call spread out and up for a small net debit, resetting your delta cushion.
Post-adjustment checklist: confirm your new max loss per contract, verify the roll didn't push you past your original position size limit, and re-set your profit target based on the new total credit collected.
What Execution Risks Can Undermine an Otherwise Sound Plan?
Even a textbook-perfect rule set fails if execution costs eat the edge. Slippage on wide-spread index options can shift your actual fill well away from the mid-price, and legging into a roll one order at a time exposes you to price movement between fills, sometimes turning a planned credit into an unplanned debit.

Assignment risk sits mostly with the short options, particularly on American-style equity options where early exercise can happen anytime the option goes deep in the money, often around dividend dates. Index options settled European-style remove that specific risk, which is one reason many condor traders prefer them. The OCC's disclosure documentation spells out exercise and assignment mechanics in full if you need the formal reference.
Before trading condors regularly, confirm your broker supports single-ticket multi-leg rolls, check margin treatment for defined-risk spreads, and verify your platform shows real-time Greeks rather than delayed data.
Pro Tip: Always price your adjustment as a single combined order first. If the platform can't fill it as one ticket at a reasonable price, that's useful information about liquidity, not just a technical inconvenience.
What Mistakes Cause the Biggest Iron Condor Losses?
Over-rolling is the most expensive habit in this strategy. Traders who roll a third or fourth time, chasing a position that's already breached its risk budget, tend to convert a manageable loss into an account-threatening one. A cap of 1 to 2 rolls per trade exists precisely to prevent that serial-rolling spiral.
Other frequent errors: sizing positions by margin requirement instead of max loss, ignoring an IV expansion that's quietly changing the trade's risk, and holding multiple condors on correlated underlyings without realizing the combined exposure moves together.
Treat these as hard stop signals:
- You're being asked to roll a third time on the same trade.
- Implied volatility has moved from compression into expansion since entry.
- You're holding several condors on correlated indexes or sectors simultaneously.
When a trade starts triggering one of these, pull out your pre-trade checklist and follow it, or step away from the screen for ten minutes before deciding anything.
How Does Decision Scoring Improve Iron Condor Management?
Most iron condor losses aren't caused by bad math. They're caused by good math getting overridden in the moment, hope replacing the stop-loss, "just one more roll" replacing the cap you set for yourself. Scoring a live setup against fixed criteria, delta level, IV rank, remaining DTE, correlated exposure, and your own stated confidence, turns a gut call into a number you can compare against your own history.
A workable process looks like this:
- Before adjusting, score the position on delta distance from your trigger, DTE remaining, and current IV rank versus entry IV rank.
- Compare that score against your pre-set threshold for "roll," "close," or "hold."
- Log the decision and the outcome, whether the trigger fired correctly or the trade moved against the model.
- Feed that outcome back into your next trade's threshold, tightening or loosening based on real results rather than memory.
Pro Tip: Review your last ten adjustment decisions monthly and check how many followed your written rules versus how many were overridden in the moment. That ratio tells you more about your edge than any single trade's P&L.
Why I Trust Rules Over Instinct on Every Iron Condor
The traders who consistently make money selling condors aren't the ones with the sharpest read on market direction. They're the ones who stopped trusting their read on market direction and built a rule set instead.
What changed my view most is how much the roll cap matters. Most traders don't blow up on the first bad trade. They blow up on the third roll of a trade they should have closed on the first one. Decision-intelligence tools that force you to score a setup before you touch it don't replace judgment. They just make sure your judgment gets a fair hearing against your own rules instead of your own adrenaline.
Turn Your Iron Condor Rules Into a Repeatable Process
Rules on paper only work if you actually follow them when a wing is tested and your account value is moving in real time. That's the gap Eialgos is built to close: a decision intelligence platform that scores your setup against a six-factor engine before you adjust, so the choice to roll, close, or hold gets checked against data instead of adrenaline.

For iron condor traders specifically, that means:
- Live scoring of delta, IV context, and DTE against your own pre-set thresholds.
- A trade checklist that flags when you're approaching your roll limit or stop-loss.
- Post-trade analytics through the LIANA assistant, so you see which adjustment decisions actually improved outcomes over time.
None of this replaces the rule set outlined above; it standardizes how consistently you apply it. If you want to see how the six-factor engine scores a live condor before you decide to roll or close, check the platform guide or start with the free tier and run your next position through it.
Frequently Asked Questions About Iron Condor Management
What is the best profit target for managing an iron condor? This reduces average winner size but raises the realized win rate compared to holding every trade to expiration.
When should you close an iron condor early?
How many times should you roll an iron condor? Cap yourself at 1 to 2 rolls per trade. A third roll usually signals you're fighting a directional move rather than managing risk objectively.
What delta triggers an iron condor adjustment? A tested short strike reaching roughly 0.30 to 0.35 delta is a common, objective trigger point that most experienced condor traders use to decide whether to roll or close.
Is it ever correct to do nothing on a live iron condor? Yes. If none of your pre-set triggers, profit target, stop-loss, time-based close, or delta threshold, have fired, holding the position unchanged is a valid, rule-based decision rather than passive neglect.
This article is general information, not a substitute for advice from a qualified financial advisor. Consult a qualified financial professional about your own circumstances before acting on anything here.
Sources
- Optionsdecay
- Iron Condor Strategy: Setup, Win Rate (65-70%) & Management
- Iron Condor Adjustments: How to Rescue and Manage a Losing Iron Condor Trade | TradeAlgo